


Bitlocker
Mitigating unauthorized data access on lost or stolen computers.

Another reason I decided to start this project is because of the PEN-200 labs. The PEN-200 labs have two active directory sets which introduce the standard active directory attacks but there is so much more, for instance the PEN-200 AD sets did not touch on group policy based attacks.
I think that having DevOps skills is a necessary part of pentesting. Being able to create a target environment that mimics the actual target that you want to try an exploit on, is essential. So, with that in mind I wanted to create an Active Directory environment for myself so I could tryout different attacks against various configurations, without having to go through the pain of configuring a virtual machine every time.
And it is a pain…
For the purposes of this writeup I’ll be going through my process of building a windows server image with Packer and testing out the image with Vagrant. If you just want the code to experiment with yourself here it is, feel free to come back if you get stuck. The intention of this writeup is to make things as clear as possible for others because when I went through learning this stuff, I spent a lot of time bruteforcing build combinations.
The first thing we need to do is build ourselves a custom windows server image. This time we’ll be using Windows Server 2016. We could grab a ready-made image from the Vagrant Cloud, but we are going to develop the ability to build our own boxes. To achieve this, we’ll use Hashicorp Packer.
Unfortunately, I haven’t found many good tutorials on specifically building Windows Domain Controllers using the official Hashicorp Packer tutorials. The tutorials all reference AWS and Docker. However, there is some pretty valuable information on automatic operating system installs which what we are after.
If you’ve ever started up an operating system for the first time you are taken through a menu where you select various features like language, keyboard settings, allowing an advertising id(windows), etc in an interactive process. In general, interactive processes kill automation because since the process is interactive it waits for an answer, from you.
Unattended.xml files allow you to answer the interactive questions automatically, as well as configure things like administrative accounts.
There are a lot of places.
There are several provisioning scripts that I use to build the image of a domain controller. The main ones are provision-domain.ps1 and provision-ad-modules.ps1.
If you ever wanted to script the promotion of a windows server to a domain controller this is how provision-domain.ps1 does it.
$DomainName = $env:DOMAIN_NAME
$DomainNetbiosName = $env:DOMAIN_NETBIOS_NAME
$DomainAdminPassword = $env:DOMAIN_ADMINISTRATOR_PASSWORD
$SafeModeAdminPassword = $env:SAFE_MODE_ADMINISTRATOR_PASSWORD
$DomainMode = $env:DOMAIN_MODE
$ForestMode = $env:FOREST_MODE
$DatabasePath = $env:DATABASE_PATH
$SysVolPath = $env:SYS_VOL_PATH
Write-Host "DOMAIN CONFIG: $DomainName $DomainNetbiosName $SafeModeAdminPassword $DomainMode $ForestMode $DatabasePath $SysVolPath"
if ((gwmi win32_computersystem).partofdomain -eq $false) {
  # Disable password complexity policy
  Write-Host "Creating Domain Controlller For Domain: $DomainName"
  secedit /export /cfg C:\secpol.cfg
  (gc C:\secpol.cfg).replace("PasswordComplexity = 1", "PasswordComplexity = 0") | Out-File C:\secpol.cfg
  secedit /configure /db C:\Windows\security\local.sdb /cfg C:\secpol.cfg /areas SECURITYPOLICY
  rm -force C:\secpol.cfg -confirm:$false


  # Set administrator password
  $computerName = $env:COMPUTERNAME
  $adminPassword = $SafeModeAdminPassword
  $adminUser = [ADSI] "WinNT://$computerName/Administrator,User"
  $adminUser.SetPassword($adminPassword)


  $SecurePassword = $SafeModeAdminPassword | ConvertTo-SecureString -AsPlainText -Force
  # Windows Server 2012 R2
  Install-WindowsFeature AD-domain-services
  Import-Module ADDSDeployment
  Install-ADDSForest `
    -SafeModeAdministratorPassword $SecurePassword `
    -CreateDnsDelegation:$false `
    -DatabasePath "$DatabasePath" `
    -DomainMode "$DomainMode" `
    -DomainName "$DomainName" `
    -DomainNetbiosName "$DomainNetbiosName" `
    -ForestMode "$ForestMode" `
    -InstallDns:$true `
    -LogPath "$DatabasePath" `
    -NoRebootOnCompletion:$true `
    -SysvolPath "$SysVolPath" `
    -Force:$true
  } else {
    Write-Host 'This Machine Is Already Part Of A Domain Aborting.'
}
The next step is to install common administration tools that you would find on a domain controller with provision-ad-modules.ps1.
####### Everything under "AD DS AND AD LDS TOOLS"
# users and computers/sites and services/domains and trusts/etc
Install-WindowsFeature -name RSAT-ADDS-Tools -IncludeAllSubFeature
Install-WindowsFeature -name RSAT-AD-AdminCenter -IncludeAllSubFeature
Install-WindowsFeature -name RSAT-ADLDS -IncludeAllSubFeature
You may not want this in your code so feel free to commment out the relevant section in the code but I use chocolatey as a package manager because I like the linux approach to manageing software applications through package managers. I Install the chocolatey and any other packages I want with provision-package-manager.ps1
# Apparently powershell uses tls 1.0 where as most https site want 1.2
[Net.ServicePointManager]::SecurityProtocol = [Net.SecurityProtocolType]::Tls, [Net.SecurityProtocolType]::Tls11, [Net.SecurityProtocolType]::Tls12, [Net.SecurityProtocolType]::Ssl3;
$webclient = New-Object System.Net.WebClient;
$webclient.DownloadFile('https://community.chocolatey.org/install.ps1', 'C:\Windows\Temp\chocolatey-install.ps1');
& "C:\Windows\Temp\chocolatey-install.ps1";
##### packages we want
choco install 7zip -y;
choco install vmware-tools -y;
choco install powershell-core -y
choco install vscode -y;
choco install visualstudiocode-disableautoupdate -y;
choco install sysinternals -y;
choco install firefox -y;
Finally I’m a bit particular (the inner sysadmin in me) so I like to have certain items pinned to my taskbar. You may have guessed already by now I have a script called provision-taskbar.ps1 which as it’s named pins shortcuts to the taskbar.
param (
    [parameter(Mandatory=$True, HelpMessage="Target item to pin")]
    [ValidateNotNullOrEmpty()]
    [string] $Target
)
if (!(Test-Path $Target)) {
    Write-Warning "$Target does not exist"
    break
}

$KeyPath1  = "HKCU:\SOFTWARE\Classes"
$KeyPath2  = "*"
$KeyPath3  = "shell"
$KeyPath4  = "{:}"
$ValueName = "ExplorerCommandHandler"
$ValueData =
    (Get-ItemProperty `
        ("HKLM:\SOFTWARE\Microsoft\Windows\CurrentVersion\Explorer\" + `
            "CommandStore\shell\Windows.taskbarpin")
    ).ExplorerCommandHandler

$Key2 = (Get-Item $KeyPath1).OpenSubKey($KeyPath2, $true)
$Key3 = $Key2.CreateSubKey($KeyPath3, $true)
$Key4 = $Key3.CreateSubKey($KeyPath4, $true)
$Key4.SetValue($ValueName, $ValueData)

$Shell = New-Object -ComObject "Shell.Application"
$Folder = $Shell.Namespace((Get-Item $Target).DirectoryName)
$Item = $Folder.ParseName((Get-Item $Target).Name)
$Item.InvokeVerb("{:}")

$Key3.DeleteSubKey($KeyPath4)
if ($Key3.SubKeyCount -eq 0 -and $Key3.ValueCount -eq 0) {
    $Key2.DeleteSubKey($KeyPath3)
}
We can build the image with:
packer build -var 'iso_url=iso\Windows_Server_2016_Datacenter_EVAL_en-us_14393_refresh.ISO' .\windows_server_2016_dc.pkr.hcl
We can then add the image to vagrants list of vms with:
vagrant box add windows-server-2016-dc windows_server_2016_dc.box
This process is almost identical to building the domain controller. The obvious difference is that we do not promote the windows server to a domain controller.
The second major difference, which took many hours of trial and error (bruteforcing build combinations), is that we change the auto-logon account vagrant to the builtin administrator by manipulating the windows registy. The reason why this is so important is that, for whatever reason, the winrm communicator of vagrant gets confused between local and domain accounts of the same name on domain clients. If you want to see what I mean for yourself remove the autologon provision from the windows server packer script. Anyway, the solution is when provisioning a domain client machine we change the auto logon user from vagrant to Administrator.
Here is the contents of provision-autologon.ps1
echo "Change default logon to builtin\Administrator"
REG ADD "HKLM\Software\Microsoft\Windows NT\CurrentVersion\Winlogon" /v DefaultUserName /t REG_SZ /d Administrator /f
Pretty simple right? But if you don’t do this you’ll be scratching your head wondering why vagrants winrm communicator times out after joining a client VM to the domain.
With those caveats out of the way,
We can build the image with:
packer build -var 'iso_url=iso\Windows_Server_2016_Datacenter_EVAL_en-us_14393_refresh.ISO' .\windows_server_2016.pkr.hcl
We can then add the image to vagrants list of vms with:
vagrant box add windows-server-2016 windows_server_2016.box
If you’ve taken the pwk course then you’ll have gotten a very good intro to tunneling. If want to practice tunneling using live VM’s then you’ll have to use the virtual network editor in VM Workstation to create any virtual subnets you want. Later we’ll add the network interface with vagrant. By default this project each has a second network interface on the 10.1.1.0 subnet.
It can be found in edit=>virtual network edit.
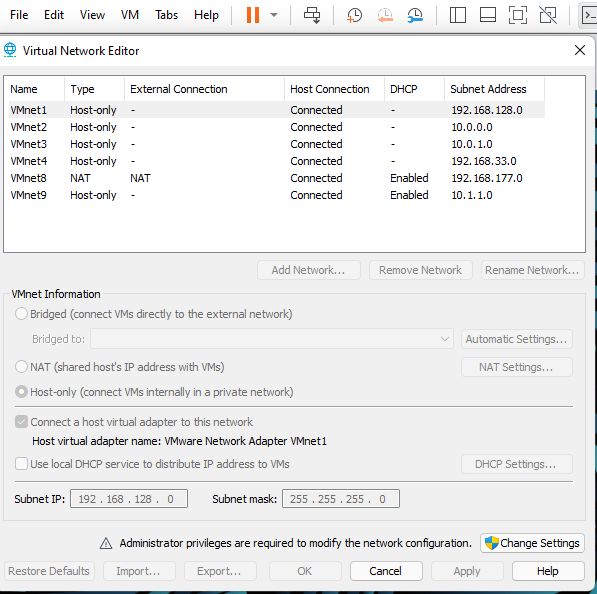 VMWare Virtual Network Editor
So now that we have our images and subnets configured we can write a vagrant script to build the domain controller and client machines.
Before we get started, running multiple vm’s at the same time a very expensive in terms of RAM. I have 48gb’s of ram installed on my desktop at the moment. I hate when money gets in the way of learning but Windows recommends 2gbs of RAM minimum to run a windows server. If you aren’t in the financial position to purchase more RAM then you might want to experiment with porting this project over to the cloud. I plan to do this at somepoint but if you do so first and have a writeup I’ll gladly mention your project on this blog.
Anyways each VM is configured to have 2 gb’s of RAM allocated it to it so I’d recommend you have atleast 16 gigs of ram.
You can build multiple VMs’s in one Vagrantfile, which is what we’ll do shortly. Here is the entire vagrantfile and there are some parts I’d talk about. You can reserve an ip address on your virtual network using vm.base_address. The vm.base_address is the ip address that vagrant uses to talk to your vm. vm.base_address is a provider specific value and at least with the VMWare provider whenenever you specify vm.base_address you must assign a mac address to your machine with vm.base_mac, which is good thing if you wanted to play with mac filtering in the future you now have the infrastructure to do so.
dc01.vm.base_address = "192.168.177.5"
dc01.vm.base_mac = "A0B0C0D0E0F0"
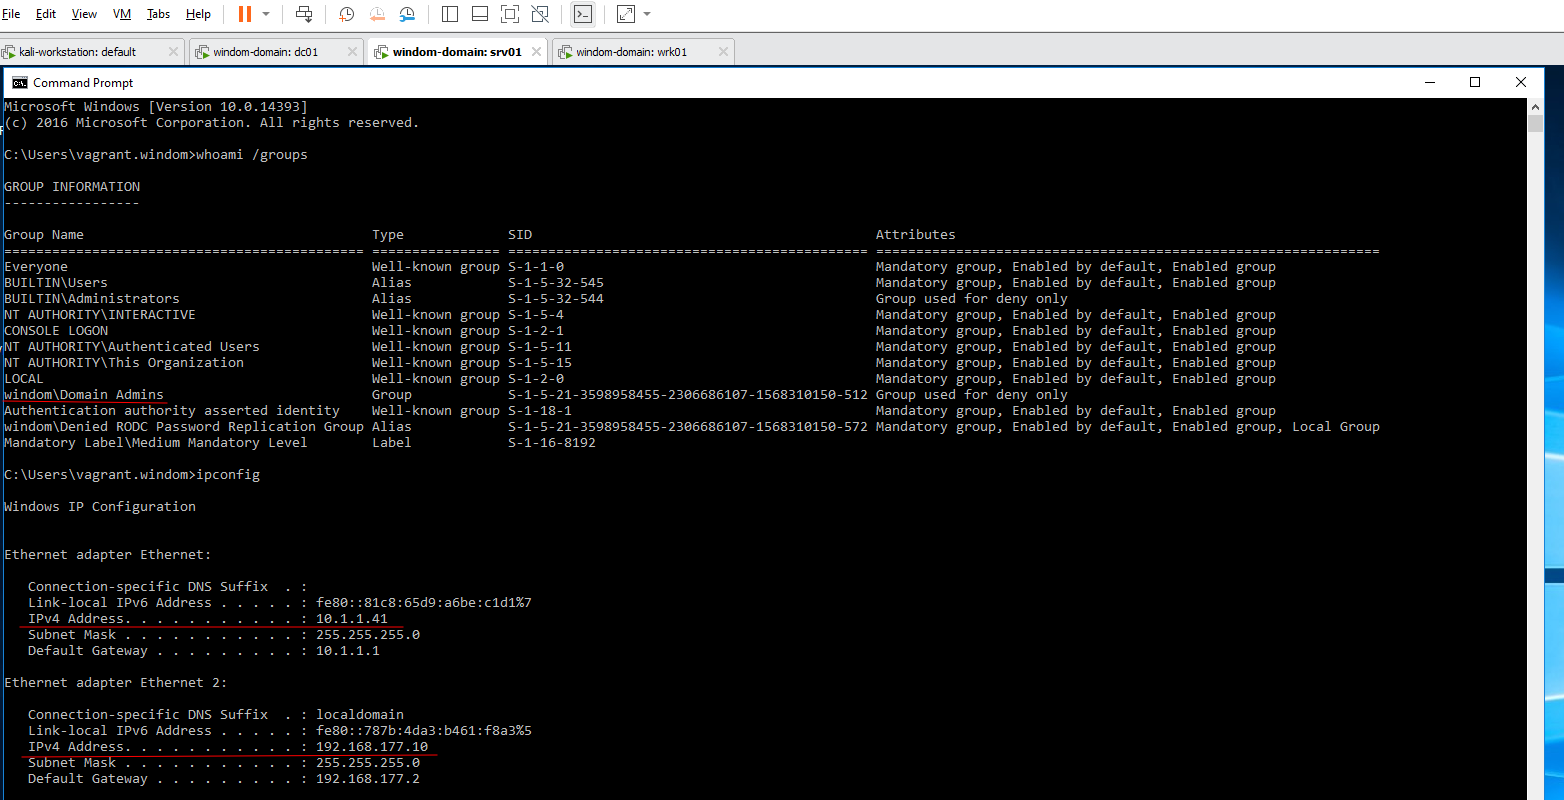
The other thing that I’d like to touch is on is configuring static ip addresses on secondary network interfaces. We give the VM a second network interface with vm.network and then use an inline provisioner script to configure properties on the interface. In the example below we configure a static ip address and point the primary dns to the domain controller.
srv01.vm.network "private_network", ip: "10.1.1.41", gateway: "10.1.1.1"
srv01.vm.provision "shell", inline: <<-SHELL
  netsh.exe int ip set address "Ethernet" static 10.1.1.41 255.255.255.0 10.1.1.1
  netsh int ip set dns "Ethernet" static 10.1.1.40
  netsh.exe int ip show addresses
SHELL
So finally we can test our build. A forewarning this can take 20-30 mins to complete.
packer build -var 'iso_url=iso\Windows_Server_2016_Datacenter_EVAL_en-us_14393_refresh.ISO' .\windows_server_2016_dc.pkr.hcl
packer build -var 'iso_url=iso\Windows_Server_2016_Datacenter_EVAL_en-us_14393_refresh.ISO' .\windows_server_2016.pkr.hcl
vagrant box add windows-server-2016-dc windows_server_2016_dc.box
vagrant box add windows-server-2016 windows_server_2016.box
cd windom-domain
vagrant up
 Domain Controller
 Domain Client 1
 Domain Client 2
Mitigating unauthorized data access on lost or stolen computers.
Backups in an Active Direcotry Environment.
Life of a Sysadmin


